

Managing Groups of Computers
Organize computers according to location, function, access permissions, or any criteria you specify. For example, you might place all servers in one group, PCs in another, and Macs in a third.
Who can use this feature? Computer groups can be managed by all LogMeIn Central account holders and any LogMeIn Central user with the Computer Group Management permission set on the Users page.
View Groups using the Groups list
Use the Groups list at the top of the page of the LogMeIn Central interface to filter computers by group or status.
The Groups list
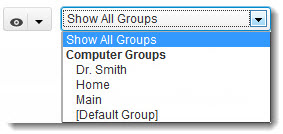
- Click a group to display all computers in the group on the Computers page
- Click Show All Groups to show all computers in all groups on the Computers page
- Click a filter to display computers that are in session, inline, or were recently accessed
View Groups using the Groups panel
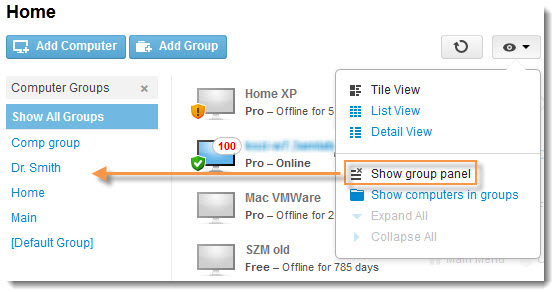
Click the
View Computers button
 at the top of the LogMeIn
Central user interface and then
Show group panel to view your computer groups in
a list next to your Computer list.
at the top of the LogMeIn
Central user interface and then
Show group panel to view your computer groups in
a list next to your Computer list.
at the top of the LogMeIn
Central user interface and then
Show group panel to view your computer groups in
a list next to your Computer list.
The Computer Groups panel button
The custom fields feature extends
computer property information and integrates with your computer list
seamlessly. Assign data of your choice to the computers you manage to find and
sort them easier, or to add descriptive information.
Hide Groups on the Computer list
Click the
View Computers button
at the top of the
LogMeIn Central user interface and then
Show computers in groups to view your computers
in a simple list, without showing groups.
at the top of the
LogMeIn Central user interface and then
Show computers in groups to view your computers
in a simple list, without showing groups.
The Computer Groups button

Manage Groups from the Computers page
On the Computers page in Tile view or Detail view, click
edit to work with groups.
Note: The [Default Group] has no edit option. By default, all new
Computers are added to [Default Group] unless otherwise specified.
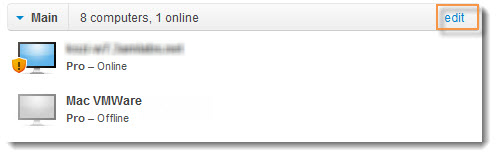
- Edit a group name
- Delete a group
- Change the computers in a group